Friday, August 24, 2012

Running - "Hi Android : My first Android app

 I m using this page to help myself to run " Hi Android" my first app. The tutorial I used is
http://developer.android.com/training/basics/firstapp/running-app.html
Please refer it for more detail.

The tutorial says that I will have all required source files available to immediately run the App.
Lets see...

It says , The app can run on,

1. Real mobile device ( a phone , tab )
2. On Android emulator

Let's see the files that are stored in this simple project ( these information are also from above tutorial).


src/ :Directory of Apps main source file.


res/: This folder has sub folders of App's resources.
drawable-hdpi/: Directory for drawable objects designed for high density screens

layout/: files that defines the user interface

values/: Folder for other xml files that contains information such as string and color definitions

AndoridManifest.xml : This file defines the fundamental characteristics of the App and its  components.


It is said following happens when the App is run:

When you build and run the default Android app, the default Activity class starts and loads a layout file that says "Hello World." ".

So I change that text from "Hello World" to "Hi Android" coz my App says "Hi Android".


I need to change it below ( I think).
Now, I next thing is to run the App....
First , running on Eclipse
I just have to press

on the tool bar...
Now , click it..........................................
ERROR... :( as expected....

I m going to investigate more on this and will write it in next post.....


Sunday, August 19, 2012

"Hi Android"-my first Android app

Now I installed everything that say it is needed to develop Android apps (hopefully). Now I m going to create my first "Android App". :). What it would do? It will just write text,

"Hi Android"

in an Android phone display.Where to start.I will use following tutorial to help myself in doing so.

http://developer.android.com/training/index.html

 I don't ve programming language experience what so ever but  I know some basics. Let's see how it goes..

First I need to create a project with Eclipse.(All what I do below is with the help of http://developer.android.com/training/basics/firstapp/creating-project.html please use it for more information).

1. Opened Eclipse
2.Clicked new Android app project. See below,
3. This opened below dialog. Since I want to get this up and running I m not dare to change any defaults. So, I keep them as it is and enter "App name" and " Project name" as in the example.
Here, Application name is the App name to the users, where as project name is the name visible in Eclipse and it is the project directory name.I do not know what is the purpose of package name(if there is anyone - then please explain me  :) ). Build SDK is the flat form Android version on which this program is built. Google says it better to be the latest so that my application can use all the latest features that latest android SDK offers.Minimum required SDK is lowest Android version that my application will support. So, this means the app I create with this settings will run on Android 2.2 Fro-yo with its minimum features while it runs on its full features on Android 4.1 Jelly bean.
I used above selections then press next to go to next step in the wizard. That step is called " Configure Launcher Icon"

 I think this icon is the one which will be used as App icon. So I accept default  settings and move forward with "Next",The next step is , "Create Activity".


what is activity, according to Google it is,"activity template from which to begin building your app".I don't get much idea of it. As advised , I select blank Activity. It seems like this gives basic structure of the App. Once I press "Next" , the next of of the wizard is for " New Blank Activity" Naming and settings.


As advised , I accept the defaults and press "Next", in next step I m asked to install Android support library.
I click "Install/Upgrade" button.Required files are then downloaded.
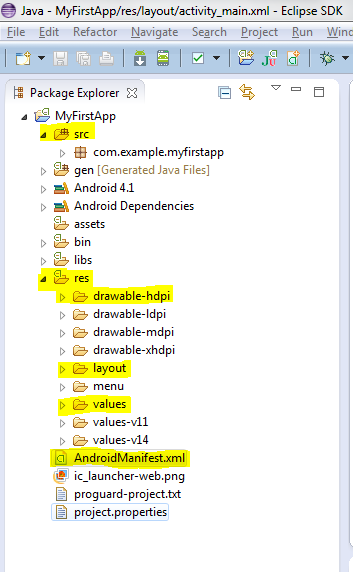
Once, downloaded , the packages that are downloaded need to be installed. Automatically a screen pop up after the down load to accept agreement. Once Accepted , packages are installed. Once that is finished, the finish button appears in the "Install Dependencies" step. Once I press finished, Eclipse set me up the project which looks complex but interesting ( of which I don't understand many ).
Google says , this has required source codes, so I can straight away run it. I ll update about it on next post. If any one of you reading there, pls give your feedback, corrections or questions.

Wednesday, August 1, 2012

Setting Up for Android Devolopment - 4

Step 4: Installing Android SDK

This is what it says in http://developer.android.com/sdk/index.html. "The Android SDK(Software Development Kit) provides you the API libraries and developer tools necessary to build, test, and debug apps for Android".

As I said in the previous post, once ADT installation is finished , Eclipse prompted me to download Android SDK.That was easy since it automatically come up and do everything. But I think it can be downloaded and connected to Eclipse also using above link.

What I got after ADT installation is following. I selected to install latest SDK and set up the target location.

If SDK is spearately installed I think I ve to use Use exisitng SDK .
In next step I got following.Here Google asked whether I m ok if they collect some usage statistics.I selected no for the time being. But I think there is no risk even if I allowed.
  
In next dialog ,  I accepted the licence and agreement and press Install to install the SDK.


 Then installation started with a progress bar and Eclipse showing what being installed.


 Once this is finished, there is a new menu item in Eclipse, "Android SDK Manager "
Once this it is opened , I can see all installed component, what more available to install and for what component updates are available.
Each time I start SDK Manager, it seems to be checking for updates online.

So I think everything in place now. What next? That is to right my first Android program "Hi Android". That is in next post.

Tuesday, July 31, 2012

Setting Up for Android Devolopment - 3

Step 3: Installing ADT

ADT stands for "Android Development Tools". It is the plug-in designed to make Eclipse the most powerful Android App development environment. By Installing ADT, Eclipse is enabled and empowered to develop Android app of any sort.

To get more details , read : http://developer.android.com/sdk/installing/installing-adt.html

Ok, I m going to do it now...
I start Eclipse, and go to help>install new software

Then , I get a dialog like below, I click add button.
In add repository dialog that appears , I add following.
Then press "OK".

you will get 2 "Available Software"s. Developer tools are the one I need for the moment. NDK as I know stands for "Native Development Kit" which allow developers to include C++ code in to Android program code which I don't need (may be fore ever :) )
When I press next , the wizard shows the list of tools that will be downloaded.Press next,
Then accept the agreement and click finish.

ADT started downloading..I think things going ok.
Once ADT download is over, Eclipse is enabled for Android devolopment and it immidiately ask for Android SDK. See below.


What is Android SDK by the way? I will write in next post.

Monday, July 30, 2012

Setting Up for Android Devolopment - 2

Step 2 : Installing JDK 6

JDK version 6 needed to run eclipse properly. If Eclipse is 64 bit then JDK has to be 64 bit.

Go to http://developer.android.com/sdk/index.html#Requirements
I go to the link JDK 6 ( highlighted).

This directs to Oracle Java download page.http://www.oracle.com/technetwork/java/javase/downloads/index.html.
Now I select Java SE 6 update 33.
Once I click download, I m directed to download page. http://www.oracle.com/technetwork/java/javase/downloads/jdk6-downloads-1637591.html
 Then I click on highlighted link since it is the 64 bit JDK version 6.
 It is a 59.7 MB file and I download it.
Then I ran the file and the JDK and JRE was installed. Next I started Eclipse to see if it works.
Here we go...

Eclipse asks for a working directory at log on . This location will be used to store projects. I changed it to D:\Android\workspace. Now Eclipse Juno is up and running :).


Sunday, July 29, 2012

Setting Up for Android Devolopment -1

Step One : Installing Eclipse

Eclipse IDE can be used to develop Android and it is the most popular. That is where you write your Android code and make it to an Android App. Google recommends Eclipse Classic" version.

Read more at  http://developer.android.com/sdk/installing/installing-adt.html. 

I ll install Eclipse , go to http://www.eclipse.org/downloads/
You will see a page like this.


Then click on link for " Eclipse classic 4.2".  I think I better install 64 bit version since my computer's operating system is 64 bit.

Once  I click on "Windows 64 bit" for the classic version, I m directed to a mirror selection page.I select the first section.
Once I click on big green download sign, I m prompted to select a download location.
It is a large file ( 183MB ). So it will take a while to download.Once downloaded , it is shown as below in Firefox downloads dialog.
Once I open down load folder there is a folder called Eclipse. Once it is opened, there is an Application called " Eclipse"Then  I run it.

Then I extract it. First problem :(


Google d the error. Found the reason could be my JDK installation being 64 bit. So, I m going to do it next. Uninstalling JDK and reinstalling it.
http://developer.android.com says JRE alone is not sufficienthttp://developer.android.com/sdk/index.html#Requirements. I need to install full JDK 6 (64 bit).


Wednesday, July 11, 2012

Android Versions...

1 Android beta ( 2007 November)
The first released Android version.


2 Android 1.0 (2008 September)
 The first relased commercial version.First Android device HTC dream ran this version.


3 Android 1.1(2009 February)


4 Android 1.5 Cupcake (2009 April)
First used the desert nickname.


5 Android 1.6 Donut (2009 September)


6 Android 2.0/2.1 Éclair (2009 October)


7 Android 2.2.x Froyo(2010 May)


8 Android 2.3.x Gingerbread (2010 December)


9 Android 3.x Honeycomb (2011 February)
 The first tablet android update.


10 Android 4.0.x Ice Cream Sandwich (2011 October)


Samsung Galaxy Nexus running Ice Cream Sandwich.

11 Android 4.1 Jelly Bean (2009 July
The latest version.

I took all these infomation from Wikipedia(Big thank for those contributors) and summarized.  If you need more details , pls see http://en.wikipedia.org/wiki/Android_version_history